New Machine Build X1 CNC Build Probotix


Page 1 of 2 12 LastLast
Results 1 to 20 of 23

Thread: X1 CNC Build Probotix

  1. #1
    Registered Wrangler97's Avatar
    Join Date
    Jun 2008
    Location
    US
    Posts
    19
    Downloads
    0
    Uploads
    0

    Default X1 CNC Build Probotix

    Hello,
    This is my first post, I would just like to show the progress of my x1 mill. I ordered a 47158 mill from harbor freight for $219, so I couldn't pass it up. I have already started converting it to cnc. First off, I took a whole entire day just cleaning off the grease. I am happy with the quality of the mill so far. I ordered three probotix motors. Two 280 in/oz motors for the x and y axis, and a 400 in/oz motor for the z axis. I made my own motor mounts out of .250 T6061 aluminum. I ordered 8mm thrust bearing for all three axis, these go on both sides of the lead screw blocks. I took the lead screws out of x and y and turned .580 in off the threads. This gave me room to put the thrust bearings. The lead screw is recessed into the block .380 in. So i only lost .200 in of travel. This makes the lead screw operate much smoother and doesn't bind. I am now waiting on the Lovejoy couplers, which should be here this week. I am going to order stepper drives tonight. I am wondering what you guys would recommend for drivers, uni polar or bipolar. The motors are 8 wires. I have a 24V 5Amp power supply. I was looking at probotix drives, but i am not sure to order bipolar or unipolar. I know probotix sells the unipolar with there three axis kits but i am unsure what to buy. I want to make sure I have enough power.

    Similar Threads:
    Attached Thumbnails Attached Thumbnails X1 CNC Build Probotix-dscf0726-jpg   X1 CNC Build Probotix-dscf0727-jpg   X1 CNC Build Probotix-dscf0674-jpg   X1 CNC Build Probotix-dscf0681-jpg  

    X1 CNC Build Probotix-dscf0697-jpg   X1 CNC Build Probotix-dscf0703-jpg   X1 CNC Build Probotix-dscf0714-jpg  


  2. #2
    Registered Wrangler97's Avatar
    Join Date
    Jun 2008
    Location
    US
    Posts
    19
    Downloads
    0
    Uploads
    0

    Default Electronics

    I ended up ordering the probotix unipolar drivers and breakout board. I also ordered limit switches and a 24v fan. I currently have a 24v 5 amp power supply. I am wondering if that will be enough to drive the motors I have. The drivers should be here tomorrow or Friday. I noticed people using a shock to help lift the spindle. Will the 400 in/oz motor lift the spindle. I know running it in unipolar I will only get 283 in/oz. Is this enough to move the head up and down without assistance? Any input would be appreciated.


  3. #3
    Registered
    Join Date
    Oct 2008
    Location
    United States
    Posts
    77
    Downloads
    0
    Uploads
    0

    Default

    I too have an X1. I got it not working from a wholesaler on e-bay for like $80 or something. Turns out the only problem with it was a bad potentiometer. A $5 fix! Anyway, I just got the extended Y-axis kit and long table from LMS and would like to CNC it at some point, so I'd like to hear how your set-up works out for you. Keep the posts coming!


  4. #4
    Registered Wrangler97's Avatar
    Join Date
    Jun 2008
    Location
    US
    Posts
    19
    Downloads
    0
    Uploads
    0

    Default CNC X1 Progress

    Well I got the electronics from probotix yesterday. I made a heatsink out out of 1x1/2 aluminum and mounted a 24v brushless fan on top. This maybe a little beefy but I want to keep the drivers cool. I ordered the lovejoy couplers about two weeks ago and they just now got put in transit. So I went and turned a few motor couplers on the lathe. They will work for now. I got everything up and running tonight. The x and y axis has .0005 backlash which I was very surprised with. That is half a thou. The green monster motor is great, it lifts and lowers the head with so much ease. I think switching to thrust bearings really is what makes it operate so smoothly. I can crush a pop can with the z axis. I still need to come up with a box to mount the electronics into. Any Ideas? I ordered the 25 dollar breakout board from probotix. It came shipped without any terminals to mount my + and - connections to. I soldered on some screw in terminals. And it is working great. I don't know if they come like that or if I got a funny one. Either way I am very happy with probotix, very fast shipping and high quality products. I will post some more pictures tomorrow after I get my bench cleaned. In the morning I am going to do some test cuts and see how things work out. Hope to post more pictures. If any one has any questions, have at it.

    Attached Thumbnails Attached Thumbnails X1 CNC Build Probotix-dscf0739-jpg   X1 CNC Build Probotix-dscf0741-jpg   X1 CNC Build Probotix-dscf0747-jpg   X1 CNC Build Probotix-dscf0750-jpg  


  5. #5
    Registered Wrangler97's Avatar
    Join Date
    Jun 2008
    Location
    US
    Posts
    19
    Downloads
    0
    Uploads
    0

    Default First Test Piece

    Well I tried the machine out for the first time this morning. I cannot believe how accurate the machine is. It has plenty of power from the steppers. The head moves so easily. Here is the test piece it is just a 1 inch pocket. The finish is so smooth without any steps in the bottom anywhere. I will post some pictures of the machine later today.

    Attached Thumbnails Attached Thumbnails X1 CNC Build Probotix-test-jpg  


  6. #6
    Registered sfrankland's Avatar
    Join Date
    Jan 2006
    Location
    Canada
    Posts
    123
    Downloads
    0
    Uploads
    0

    Default

    Looks good.


  7. #7
    Registered
    Join Date
    Oct 2008
    Location
    United States
    Posts
    77
    Downloads
    0
    Uploads
    0

    Default

    That looks awesome! I'm a total newbie at this stuff, so I may not fare as well as you have, but now I'm excited to start working on mine. I just have to wait for the snow to clear some so I can get to the garage. I'm nursing a shattered femur, so traversing the ice is a bad idea! The temp is supposed to be in th 40's the next few days, so hopefully it'll clear up enough to let me get out there to play.


  8. #8
    Registered
    Join Date
    Feb 2010
    Location
    USA
    Posts
    2
    Downloads
    0
    Uploads
    0

    Default

    Looks good fella. Let's see some light aluminum work. Woowoo


  9. #9
    Registered Wrangler97's Avatar
    Join Date
    Jun 2008
    Location
    US
    Posts
    19
    Downloads
    0
    Uploads
    0

    Default Machine Is Finished

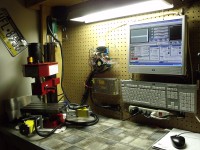
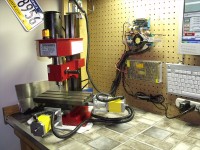
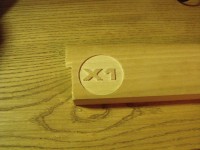
    I cannot attach any pictures it gives me a failed upload error. The kb is low and they are under 800 x 600. I mounted all the electronics on a board and mounted it on the peg board. I ran all the wires and mounted everything real sweet like. I made a pocket with X1 in the middle. I used an 1/8 inch four flute endmill. If I would have had something two flute the finish would have been a little more crisp around the edges. I stopped it after two roughing passes for lack of time to finish. It would have been even nicer with a .003 finish pass. I am looking forward to doing some work in aluminum tomorrow. I will post more pictures. Is there any interest in having me put these machines together to sell? I am just curious, I had a good time building this. Let me know what you guys think.


  10. #10
    Registered
    Join Date
    Feb 2009
    Location
    USA
    Posts
    11
    Downloads
    0
    Uploads
    0

    Default Probotix Breakout Board

    Wrangler 97,

    Got the same breakout board and drivers as you. The power for the breakout board has two power options, USB (they say this is experimental?) and the onboard solder points. I assume they want you to use the USB for power only? Like you, I preferred to use the other power input so I don't have to run a second cable just for powering the board via USB. I found the same blue pc mount wire blocks as on the board and plan on soldering that onto the board myself. If you or anyone else need one of the wire blocks just PM me on this forum.

    Otherwise it's great to see your progress and success with the mill conversion. I'm in process of using the same boards for a laser engraver/cutter. My working area will be approx 35" X 26" using an aluminum gantry rolling on v-groove bearings. I have collected all the parts and currently working on the electronics and system base.

    I hope to be posting my progress soon over in the Other Machines/Laser forum - http://www.cnczone.com/forums/forumdisplay.php?f=79

    Look forward to another update of your machine.

    Also tried to upload some pics that were 800 X 600 41 kb and no go!?


  11. #11
    Registered Wrangler97's Avatar
    Join Date
    Jun 2008
    Location
    US
    Posts
    19
    Downloads
    0
    Uploads
    0

    Default Breakout Board

    pyrofx,

    Ok your machine build sounds interesting. I had an old cnc geeker board I fried and used the terminals off it it, Thanks for the offer though. Still can't post any pictures right now, I even tried making them smaller than 800 x 600, the site must be having problems. I have the finished photos to post, hopefully they will be coming soon.


  12. #12
    Registered Wrangler97's Avatar
    Join Date
    Jun 2008
    Location
    US
    Posts
    19
    Downloads
    0
    Uploads
    0

    Default New Pictures


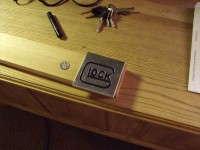
    I finally got the wires and drivers mounted and routed. This machine is absolutely amazing. Tons of power. I ripped through aluminum with no problem taking .030 passes with ease. Check out the Glock logo. Let me know what you guys think.


  13. #13
    Registered
    Join Date
    Feb 2010
    Location
    USA
    Posts
    2
    Downloads
    0
    Uploads
    0

    Default Wowee

    I think it looks awesome!!


  14. #14
    Registered Teyber12's Avatar
    Join Date
    Jul 2008
    Location
    USA
    Posts
    922
    Downloads
    0
    Uploads
    0

    Default

    wow nice!

    i thought the alu engraving said something else at first... hmmm!

    I think you are having good luck with the x1 because it looks like you did a top notch job on the conversion. For $220 you can't complain.

    cheers!


  15. #15
    Registered
    Join Date
    Feb 2009
    Location
    USA
    Posts
    11
    Downloads
    0
    Uploads
    0

    Default Wall Mount CNC!

    Quote Originally Posted by Wrangler97 View Post
    I finally got the wires and drivers mounted and routed. This machine is absolutely amazing. Tons of power. I ripped through aluminum with no problem taking .030 passes with ease. Check out the Glock logo. Let me know what you guys think.
    Looks great!

    I think you defined a new class of CNC projects, Wall Mount CNC. Good solution for keeping the electronics out of the chips. Feel inspired to do such a conversion in the future.

    Photo of my Probotix breakout board and stepper drivers. I plan to mount mine under the table out of harms way (smoke).

    http://twitpic.com/161c70

    Last edited by pyrofx; 03-01-2010 at 04:21 PM.


  16. #16
    Registered Wrangler97's Avatar
    Join Date
    Jun 2008
    Location
    US
    Posts
    19
    Downloads
    0
    Uploads
    0

    Default Machine Build

    Thanks for all the replies, I know there are a lot of people who talk down on the x1 for power and accuracy. I hope this thread can show people that if you take your time and think these machines out, the results can be rewarding. I have had this idea in my head for the past two years and thought every detail out and researched everything before I even started the build. If you guys have any questions feel free to ask.


  17. #17
    Registered voltsandbolts's Avatar
    Join Date
    Aug 2005
    Location
    U.S.A.
    Posts
    437
    Downloads
    0
    Uploads
    0

    Default

    Nice job!

    Deeds not words...
    VoltsAndBolts runs RC for the builder. http://www.voltsandboltsonline.com/ My Forum


  18. #18
    Registered Wrangler97's Avatar
    Join Date
    Jun 2008
    Location
    US
    Posts
    19
    Downloads
    0
    Uploads
    0

    Default Love Joys

    I finally got my lovejoys in the mail the other day, I waited about three weeks for these. I put them on the x and y axis, but i kept the solid coupler on the Z axis since it worked so flawlessly already. What do you guys use to engrave with tooling wise?

    Attached Thumbnails Attached Thumbnails X1 CNC Build Probotix-lovejoys-jpg  


  19. #19
    Registered Arich0908's Avatar
    Join Date
    Oct 2009
    Location
    BridgePort , CT
    Posts
    446
    Downloads
    0
    Uploads
    0

    Default

    I no absolutely nothing bout CNC .
    I would love to build one. But dont know what I need and how.
    I also have a x1 . I wish some one would do a build ( hint hint) with a step by step so the noob can understand what the heck is going on


  20. #20
    Registered Wrangler97's Avatar
    Join Date
    Jun 2008
    Location
    US
    Posts
    19
    Downloads
    0
    Uploads
    0

    Default Project Box

    Here is a new project box I made for a robotic crawler. It came out really well.

    Attached Thumbnails Attached Thumbnails X1 CNC Build Probotix-808-jpg  


Page 1 of 2 12 LastLast

Tags for this Thread

Posting Permissions

  • You may not post new threads
  • You may not post replies
  • You may not post attachments
  • You may not edit your posts
  •  


About CNCzone.com

    We are the largest and most active discussion forum for manufacturing industry. The site is 100% free to join and use, so join today!

Follow us on


Our Brands

X1 CNC Build Probotix

X1 CNC Build Probotix